Please Read Before Placing The Order - We are wholesalers & we are offering Raw Materials for much less cost than Amazon. We cannot offer free shipping or any discount on shipping cost. Once your order is packed our team will reach out to you with exact shipping cost which needs to be paid seperatly based on the exact shipping cost as per final weight & dimension of package. Dispatch Timeline - 3 to 4 days minimum. Unboxing video is must to resolve missed item issue. Happy Candle 🕯️ Making.

How to Make Your Own Silicone Mold at Home
Ready-made silicone molds cover most of the shapes you will ever need for candles, soap, or resin. You can find hearts, florals, geometric designs, and novelty shapes in almost any craft store or wholesale supplier.
But sometimes none of them match what you actually want. Maybe you need a logo shape for your brand. Maybe you want to recreate a family heirloom design, a specific festival motif, or a completely original piece nobody else is selling.
This is exactly where making your own silicone mold becomes useful. It sounds like a technical, factory-level process, but it is something you can genuinely do at home with the right materials and a bit of patience.
In this guide, we will walk through the entire process from start to finish. You will learn what materials you need, how to prepare your model, how to mix and pour silicone correctly, and how to avoid the mistakes that ruin most first attempts. By the end, you should feel confident making your first custom mold.
Why Make Your Own Silicone Mold?
Before we get into the process, it helps to understand why this skill matters for candle and soap businesses. If you sell handmade products, your mold shapes are often part of your brand identity. Anyone can buy the same heart or rose mold that hundreds of other sellers already use.
A custom mold changes that. It lets you create a shape that is uniquely yours, something customers cannot find anywhere else. This is especially valuable for businesses building a recognizable product line, launching a signature collection, or creating branded corporate gifting items with a logo or specific design.
There is also a practical cost angle. If you need one particular shape repeatedly and it simply does not exist as a ready-made mold, making your own becomes more affordable than commissioning a custom mold from a manufacturer. Over time, and across many pours, a self-made mold often pays for itself.
Two Main Types of Silicone Used for Mold Making
Before buying materials, it helps to understand there are two broad categories of silicone rubber used for mold making. Knowing the difference will help you choose the right product for your project.
Tin-cure silicone (condensation cure) is generally cheaper and easier to find. It cures using moisture in the air and a tin-based catalyst. It works well for most candle and soap mold projects. The main downside is that it can shrink slightly over time and has a shorter shelf life once opened.
Platinum-cure silicone (addition cure) is more expensive but gives better dimensional accuracy, less shrinkage, and a longer working life. It is the preferred choice for detailed, professional-grade molds, and it is safe to use with skin-contact products like soap and cosmetics once fully cured.
For most home-based candle and craft businesses, tin-cure silicone is a good starting point because it is more budget-friendly. As you scale up and need more precision or plan to sell molds commercially, platinum-cure silicone becomes worth the extra cost.
What You Need
Before you begin, gather all your craft materials to make mold in advance. Mold making does not leave much room for pausing halfway through to search for a missing tool, since silicone begins curing the moment the catalyst is added.
- Liquid Silicone Rubber (LSR) with its matching catalyst.
- A model or object to cast, which becomes your mold’s shape.
- A mixing container, ideally disposable or dedicated only to silicone work.
- A stir stick or flat spatula.
- A digital weighing scale, accurate to at least 1 gram.
- A mold box or container to hold the silicone while it cures around your model.
- Mold release spray, useful for models with tricky undercuts or fine detail.
- Clay or plasticine, if you need to build a mold box wall or seal gaps.
- Gloves and a well-ventilated workspace.
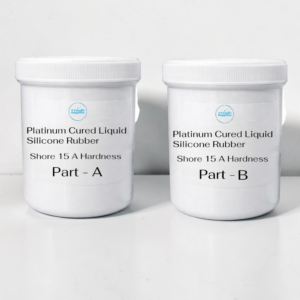
Making Silicone Mold in 6 Simple Steps At Home
Now you can make silicone mold for your candle or soap making business at home in 6 simple steps. If you have all the instruments and ingredients you can start as follow the step 1.
Step 1: Choose or Create Your Model
Your model is the master object you want to turn into a reusable mold. This can be something you already own, like a small figurine, a decorative object, or a 3D printed shape designed specifically for this purpose. It can also be something you sculpt yourself using clay, following a design you have sketched out.
Whatever you choose, the model needs to be rigid enough to hold its shape under the weight of wet silicone. It also needs a surface that will not react badly with silicone or absorb it permanently.
Avoid using porous materials such as unsealed wood, raw plaster, or certain types of clay unless you seal them first with a compatible sealant. Porous surfaces can bond with the silicone as it cures, which will destroy both your model and your new mold when you try to separate them.
If you are unsure whether a material is safe to use, test a small amount of silicone on an inconspicuous part of the model first. Let it cure fully, then check whether it releases cleanly.
Step 2: Build a Mold Box
Once your model is ready, you need a containment structure to hold liquid silicone around it while it cures. This is usually called a mold box or pour box.
You can build a simple one using cardboard, foam board, plastic sheets, or even interlocking building blocks. Some hobbyists reuse plastic containers of the right size instead of building a box from scratch, which works well for smaller projects.
Place your model in the center of the box, either standing on a base or suspended with a small support, depending on the shape. Leave enough clearance around the model on all sides, ideally at least 1 to 2 centimeters. This space becomes the wall thickness of your finished mold, and thin walls tend to tear or distort more easily once you start using the mold repeatedly.
Seal any gaps at the base of the mold box with clay, hot glue, or tape. Even a small gap can let liquid silicone leak out during pouring, which wastes material and can ruin your entire batch.
Step 3: Measure and Mix the Silicone Rubber
Liquid silicone rubber usually comes as a two-part system, a base component and a catalyst or hardener. The exact mixing ratio varies between brands and product lines, so always check the manufacturer’s instructions before you start.
Place your mixing container on the digital scale and zero it out. Pour in the base component first, then add the catalyst according to the ratio specified on the packaging. Common ratios include measurements like 10 parts base to 1 part catalyst by weight, though this differs across products.
Accuracy matters here more than almost any other step in the process. Adding too much or too little catalyst can leave your silicone permanently sticky, or cause it to cure unevenly with soft and hard patches.
Once both components are measured, mix them together slowly and thoroughly using your stir stick. Scrape the sides and bottom of the container regularly, since unmixed silicone hiding in the corners will not cure properly and can weaken your finished mold.
Take your time with this step, mixing for at least two to three minutes depending on the product. Rushing the mix is one of the most common reasons a mold turns out uneven or fails to fully set.
Step 4: Pour the Silicone Over Your Model
Once your silicone is mixed thoroughly, you need to pour it into the mold box before it begins to set. Most silicone products give you a working window, often called pot life, which can range from a few minutes to half an hour depending on the formula.
Pour in a thin, steady stream, aiming for one corner of the mold box rather than pouring directly over the model. Letting the silicone flow and rise naturally around the model, rather than dumping it straight on top, helps trap fewer air bubbles.
Pouring from a slight height, around 15 to 20 centimeters above the box, can also help break up air bubbles as the silicone falls. If you have access to a vacuum chamber, degassing the mixed silicone before pouring will give you an even cleaner result, though this is optional for most home projects.
Continue pouring until the silicone fully covers your model with the wall thickness you planned in step two. Gently tap the sides of the mold box on your work table several times after pouring. This helps release any remaining trapped air bubbles that could otherwise show up as small pits on your finished mold’s surface.
Step 5: Let It Cure
Curing time depends heavily on the specific silicone product you are using, as well as your room’s temperature and humidity. Most liquid silicone rubbers used for mold making cure somewhere between 16 and 24 hours at normal room temperature, though some fast-cure formulas set in just a few hours.
During this curing period, it is important not to move, tilt, or disturb the mold box. Any movement while the silicone is still partially liquid can create weak spots, uneven surfaces, or shift your model out of position.
Keep the mold box in a stable, dust-free area away from direct sunlight and temperature extremes. Very cold rooms can slow curing significantly, while very hot or humid conditions can sometimes speed it up unpredictably, especially with tin-cure silicone.
If you are unsure whether your mold has finished curing, gently press a small, inconspicuous area with a clean finger. Fully cured silicone should feel firm and slightly bouncy, not tacky or wet to the touch.
Step 6: De-mold Your New Silicone Mold
Once you have confirmed the silicone is fully cured, carefully disassemble the mold box around it. Peel away cardboard walls or unclip building blocks, working slowly so you do not accidentally tear the new mold.
Gently peel the cured silicone away from your model, starting from one edge and working around gradually. Flexible, properly cured silicone should release from most models cleanly, without sticking or tearing, assuming you chose a compatible model material in step one.
Once removed, trim away any excess flashing or thin overflow silicone around the edges using sharp scissors or a craft knife. This gives your mold a neat, finished edge and makes it easier to use for future pours.
Inspect the inside cavity carefully for any trapped debris, dust, or imperfections. Small flaws at this stage can be cleaned up now, before they become a permanent part of every candle or soap you make from this mold going forward.
Tips for Better Results
- Work in a dust-free space: Dust particles that land in wet silicone become permanently trapped once it cures, showing up as small bumps or texture flaws in every future casting.
- Test cure a small batch first: Before committing your full quantity of silicone to a large project, mix a small test batch to confirm the exact set time and check that your ratio and mixing technique are correct.
- Add a pour spout or funnel opening: If you plan to pour wax, resin, or soap into your finished mold later, think ahead and leave an opening in your mold box design that is large enough for comfortable pouring.
- Use mold release spray for complex models: Models with deep undercuts, sharp inner corners, or very fine surface detail benefit from a light coat of release spray before you pour. This makes the eventual demolding process much easier and protects delicate details from tearing.
- Label your finished molds: If you plan to make several custom molds over time, note the silicone type, cure date, and intended use somewhere on or near each mold. This small habit saves confusion later, especially once you have a growing collection.
Common Mistakes When Making Silicone Molds
Skipping accurate ratio measurement is by far the most common reason a mold fails. Silicone that stays sticky or never fully hardens almost always points back to an incorrect base-to-catalyst ratio.
Pouring too quickly, or pouring directly on top of the model instead of along the mold box wall, traps air bubbles inside the silicone. These bubbles later appear as small bumps or holes on the surface of your finished mold, and eventually on every candle or soap piece it produces.
Choosing a model made from an incompatible material can cause the silicone to bond permanently to it. This ruins both your model and your new mold in a single mistake, so always test compatibility on a small area first if you are uncertain.
Rushing the curing time is another frequent issue, particularly for beginners eager to see their finished mold. Demolding too early, before the silicone has fully set, can leave you with a mold that is soft, distorted, or torn.
Buy Liquid Silicone Rubber for Mold Making
V Candle Supplies stocks liquid silicone rubber in bulk for candle makers, soap businesses, and craft studios across India. Whether you are testing your first small batch or placing a larger wholesale order to support ongoing custom mold production, our team can help you choose the right silicone type and quantity for your project.
Frequently Asked Questions
How long does a homemade silicone mold last?
A well-made mold from good quality liquid silicone rubber can typically last for 50 to 100 or more pours, similar to many commercial molds, as long as it is handled and stored correctly between uses.
Can I use silicone sealant instead of liquid silicone rubber?
No, this is a common mistake for beginners. Silicone sealant, the kind used for bathroom or kitchen caulking, is not formulated for mold making. It typically will not release cleanly from a model, and it does not capture fine detail the way proper liquid silicone rubber does.
Is making your own mold cheaper than buying a ready-made one?
For a single, simple shape you only need occasionally, buying a ready-made mold is usually more affordable. For custom, branded, or repeated designs that are not available commercially, making your own mold often becomes more cost-effective the more times you use it.
Do I need special equipment like a vacuum chamber?
No, a vacuum chamber is not required for most home mold-making projects. It simply helps remove air bubbles more thoroughly. Careful, slow pouring combined with gentle tapping of the mold box is usually enough for good results at a hobby or small business scale.
What is the shelf life of liquid silicone rubber before I use it?
This varies by brand and formula, but most products list a shelf life of around 6 to 12 months from manufacture if stored in a cool, dry place with the container sealed tightly between uses.