Please Read Before Placing The Order - We are wholesalers & we are offering Raw Materials for much less cost than Amazon. We cannot offer free shipping or any discount on shipping cost. Once your order is packed our team will reach out to you with exact shipping cost which needs to be paid seperatly based on the exact shipping cost as per final weight & dimension of package. Dispatch Timeline - 3 to 4 days minimum. Unboxing video is must to resolve missed item issue. Happy Candle 🕯️ Making.
Please Read Before Placing The Order - We are wholesalers & we are offering Raw Materials for much less cost than Amazon. We cannot offer free shipping or any discount on shipping cost. Once your order is packed our team will reach out to you with exact shipping cost which needs to be paid seperatly based on the exact shipping cost as per final weight & dimension of package. Dispatch Timeline - 3 to 4 days minimum. Unboxing video is must to resolve missed item issue. Happy Candle 🕯️ Making.
Making Mithai-Shaped Candles: A Step-by-Step Guide
Mithai-shaped candles have become one of the most popular festive products across India in recent years. Shapes like kaju katli, ladoo, and barfi feel instantly familiar and festive, which makes them naturally gift-worthy without needing much additional explanation to customers.
This guide walks you through the entire process of making these candles from scratch, so you can confidently add mithai shaped candles to your product line ahead of this festive season.
Why Mithai Candles Sell So Well
Customers immediately connect mithai shapes with festivals, family celebrations, and thoughtful gifting occasions. A candle shaped like a familiar sweet feels playful and personal at the same time, which gives it an emotional pull that generic candle shapes often lack.
These candles also work as a genuinely practical alternative to actual sweets for return gifts, festive hampers, and corporate gifting during Diwali and wedding season. Unlike real mithai, they do not spoil, which makes logistics and bulk gifting far simpler for both sellers and buyers.
Making of Mithai-Shaped Candles in 6 Steps
Ingredients
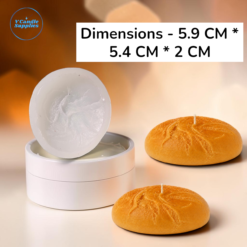
Mithai-shaped silicone molds, such as kaju katli or ladoo designs.
Soy wax or a wax blend suited to detailed molds.
Fragrance oil, ideally something warm or sweet-toned.
Candle color, in soft cream, gold, or pastel tones.
A double boiler or melting pot.
A pouring jug with a spout.
A thermometer.
Step 1: Choose the Right Mold
Pick a multi cavity mithai mold if you plan to sell in meaningful bulk quantities. Diamond-shaped molds work particularly well for recreating kaju katli, while rounded cavities suit ladoo-style designs much more naturally.
Check carefully that your chosen mold has enough detail depth to capture the actual texture of the real sweet it is meant to represent. This level of surface detail is exactly what makes the finished candle instantly recognizable to customers.
Melt your wax slowly using a double boiler setup rather than direct heat, which gives you much better temperature control throughout the process.
Heat it to your wax supplier’s recommended pouring temperature, usually somewhere between 60 to 70 degrees Celsius for most soy-based blends.
Avoid overheating your wax at this stage, since excessive heat can damage color pigments and noticeably reduce your finished candle’s overall fragrance strength once it cures.
Step 3: Add Color
Mithai candles look most realistic and appealing when kept in warm, muted tones rather than bright artificial shades. Light golden yellow works particularly well for kaju katli designs, while soft orange or cream tones suit ladoo shapes more naturally.
Add your color gradually to the melted wax, mixing thoroughly after each small addition. Start lighter than you think you need, since you can always deepen the shade further, but removing excess color once added is essentially impossible.
Step 4: Add Fragrance Oil
Choose a fragrance that genuinely matches the mithai theme you are working with, such as saffron, cardamom, rose, or a warm, sweet vanilla blend. Add your fragrance oil at the ratio recommended by your wax supplier, typically somewhere between 6 to 10 percent by weight.
Stir the fragrance in gently but thoroughly, making sure to distribute the scent evenly throughout the entire batch of wax before you move on to pouring.
Step 5: Pour Into the Mold
Pour slowly into each individual cavity using a spouted jug, which gives you much better control over the flow compared to pouring straight from a large pot. Fill each cavity completely but avoid overfilling, since mithai molds often have fine detail concentrated near the edges that can be lost by spillage.
Tap the mold gently against the table several times immediately after pouring. This simple step helps release any trapped air bubbles that could otherwise leave visible marks on the finished candle’s surface.
Let the candles cool completely at normal room temperature, which typically takes around 4 to 6 hours depending on the size of the pieces. Avoid moving or disturbing the mold at all during this cooling window.
Once de-molded, allow the candles to cure fully for 24 to 48 hours before you move on to packaging them. This curing period allows the fragrance to properly bind with the wax, resulting in a noticeably stronger scent once burned.
Step 7: Finish and Package
Add a light dusting of mica powder across the surface for a realistic mithai sheen, similar in appearance to the silver varq traditionally used on real Indian sweets. This one small finishing touch genuinely makes a significant visual difference to the final product.
Package the candles either individually or in small mithai-style boxes for a premium, ready-to-gift presentation that matches the overall festive theme of the product.
Tips for Selling Mithai Candles
Sell them in assorted sets rather than as single individual pieces whenever possible. Customers tend to respond very well to a small gift box containing 4 to 6 different mithai shapes bundled together.
Time your production carefully around key festivals like Diwali, Raksha Bandhan, and wedding season, since this is exactly when demand for festive gifting products naturally spikes across the market.
Offer clear bulk pricing tiers for corporate and wedding favor orders specifically, since this particular category tends to perform especially well for large volume gifting requirements from businesses and event planners.
Common Mistakes to Avoid
Do not use overly bright or artificial-looking colors for this style of candle. Realistic, muted mithai shades consistently sell better than neon or overly saturated tones that look less authentic to the theme.
Do not skip or rush through the curing time under any circumstances. Fresh, uncured candles very often have a noticeably weaker scent throw during their very first burn compared to properly cured pieces.
Do not overload your fragrance oil beyond the recommended ratio in an attempt to boost scent strength. Doing so can cause sweating or a greasy surface texture, which is particularly noticeable and unattractive on detailed molds.
Frequently Asked Questions
Can I make mithai candles without color?
Yes, natural cream-colored wax already resembles many mithai shades. Color simply enhances realism.
What is the best wax for detailed mithai molds?
A soy wax blend with good detail retention works best. Pure soy wax can sometimes struggle to capture very fine texture.
How long do mithai candles keep their fragrance?
When cured properly and stored away from heat and sunlight, they hold fragrance well for 6 to 12 months.
Shop Mithai-Shaped Molds
V Candle Supplies stocks a range of mithai shaped silicone molds, along with fragrance oils and colors suited for festive candle lines, available at wholesale rates for businesses across India.